
AI video upscaling can restore perceived detail and reduce compression damage in low-resolution footage, but it is not a cure-all. It works best when you test a representative clip first and confirm the output stays stable frame to frame. If your source footage is heavily compressed, shaky, or already low-light, run a short test before committing a full project to it, because temporal consistency problems only show up once motion enters the frame — use tools like the AI Content Optimization Audit to help validate results early.
TL;DR:
- AI video upscaling improves detail, reduces compression artifacts, and sharpens edges, but still struggles with severe motion blur and low-light footage.
- It is most effective for moderate resolutions like 1080p, with 4K benefits mainly seen in static, detailed shots such as real estate or luxury marketing.
- Keyframe propagation methods, like SparkVSR, enhance temporal consistency by anchoring on high-quality frames instead of processing each frame independently.
- Testing should involve short clips with faces, text, or logos, comparing multiple settings side by side at full resolution to detect flicker or drift.
- Hardware and workflow choices depend on project scale, with local GPUs better for frequent large jobs and cloud services suitable for occasional, smaller projects.
Table of Contents
- What AI video upscaling actually changes beyond resizing
- How modern VSR models handle motion and temporal consistency
- Who benefits most and which resolution to target
- How to choose a tool or workflow: criteria and a testing checklist
- A practical workflow from prep to final delivery
- Common pitfalls and the quality checks that catch them
- Processing limits: real-time versus offline, and what hardware you need
- How a production agency integrates AI upscaling into client work
- Get an honest read on your footage before you commit to a full render
- FAQ
- Sources
What AI video upscaling actually changes beyond resizing
Simple resizing stretches pixels. Video super-resolution, the technical term behind AI video upscaling, uses a trained model to predict missing detail, reduce compression artifacts, and rebuild edges that a stretch-and-blur method cannot recover. The Microsoft Learn documentation for its VSR feature defines the process this way: AI-based upscaling that restores detail lost to compression or a low-quality source, not just a bigger frame.
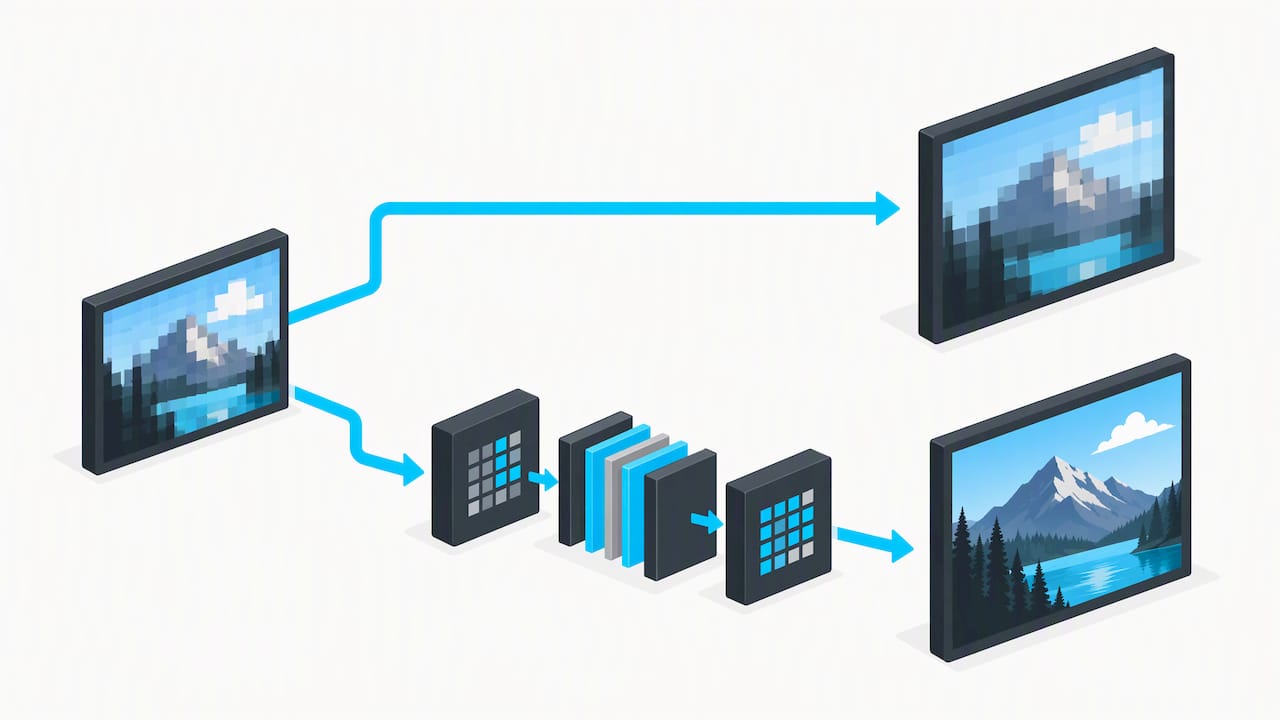
That same documentation sets real boundaries. For real-time use, input ranges from 240p to 1440p and output tops out around 1440p. Offline processing, which most production work falls under, can push to 4K.
What to expect visually:
- Sharper edges on text, logos, and fine lines
- Reduced blockiness and banding from heavy compression
- Better skin texture and fabric detail, though not invented detail that was never captured
- No fix for severe motion blur or out-of-focus footage
How modern VSR models handle motion and temporal consistency
A still frame can look remarkable and the full clip can still flicker. That gap is the central challenge in video super-resolution, and it is why single-frame upscalers, the kind built for photos, tend to struggle on video. Multi-frame and diffusion-based models process sequences rather than isolated frames, which helps preserve consistency across motion.
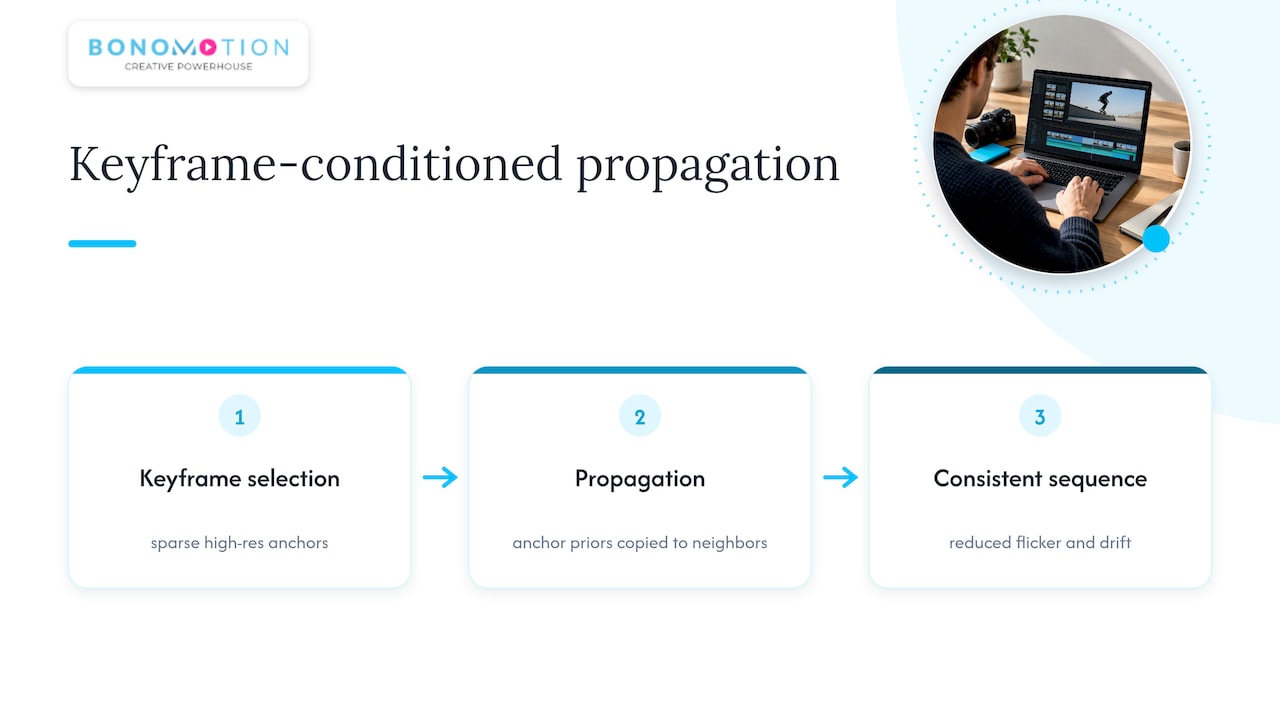
One approach worth understanding is keyframe propagation, demonstrated in research like SparkVSR. Instead of processing every frame independently, the model anchors on sparse high-resolution keyframes, selected by a user or pulled from codec I-frames, and propagates that quality across the surrounding sequence. SparkVSR reports that this keyframe-conditioned propagation measurably improves temporal consistency compared to frame-independent methods, because every frame in between inherits priors from a verified anchor rather than guessing on its own.
The practical takeaway for anyone reviewing upscaled footage: never judge quality from a single exported frame. A gorgeous hero frame can hide drifting faces, warped logos, or flicker that only becomes obvious once you watch the sequence at full speed.
Who benefits most and which resolution to target
Not every project needs 4K, and chasing it without a reason adds cost and risk without a payoff.
- Social shorts and web video: 1080p is usually enough since most phone and feed playback compresses heavily anyway.
- Corporate testimonials and interviews: 1080p to 4K depending on whether the footage will play on a large screen at an event or conference.
- Event highlight reels: 1080p is standard unless the footage feeds a large venue display.
- Real estate and yacht marketing: 4K often pays off here, since slow pans and static wide shots reveal fine detail that compressed 1080p cannot hold up under zoom.
A good rule of thumb: match resolution to viewing distance and platform ceiling. If the delivery platform compresses everything back down to 1080p anyway, pushing your source to 4K mainly burns processing time and storage.
How to choose a tool or workflow: criteria and a testing checklist
Picking the right upscaling approach matters more than picking the flashiest tool. Prioritize these criteria in order:
- Temporal consistency handling, meaning the tool processes sequences rather than isolated frames.
- Keyframe or anchor-frame control, so you can guide difficult sections manually.
- Codec and color support, including 10-bit and HDR if your source uses them.
- Privacy and upload policy, especially for unreleased client footage.
- File size and processing credit limits, which affect whether a full project is even feasible.
Before committing to a full render, run this checklist on a short test clip:
- Select a representative 15 to 30 second segment that includes faces, text, and motion.
- Run one to three presets or settings on that segment only.
- Compare outputs side by side at full resolution, not thumbnail size.
- Inspect faces, text, and logo frames specifically, since these reveal identity drift fastest.
- Check multiple frame ranges, not just the opening seconds, since flicker often appears mid-clip.
Pro Tip: Never evaluate an upscaler on a single exported still. Play the test clip at full speed and watch the background, not just the subject.
Red flags worth asking a vendor about directly: does the tool support the codec your footage is delivered in, what happens to footage after upload, and whether the service documents input and output resolution limits the way Microsoft’s VSR documentation does for its own feature.
A practical workflow from prep to final delivery
A managed upscaling project runs in three stages, and skipping the middle one is where most rework comes from.
- Preparation. Archive your original files before touching anything. If your source uses a proprietary or hard-to-edit codec, transcode a working copy first. Identify two or three representative segments that include the riskiest content: faces, text, logos, fast motion.
- Preview. Render short test passes on those segments only. Review for flicker, color shifts, and identity drift. If the tool supports anchor or keyframe selection, refine those choices here rather than on the full render.
- Final delivery. Export using a container and color profile that matches your delivery target, and avoid recompressing an already-compressed file multiple times, since each pass compounds artifacts. Run a final QC pass checking faces, text legibility, and motion stability before sending anything to a client.
Pro Tip: Build QC time into your schedule the same way you budget for color correction. A ten-minute review pass catches problems that take hours to fix after delivery.
Common pitfalls and the quality checks that catch them
Most upscaling failures fall into a short list of repeat offenders.
- Temporal flicker: brightness or detail that pulses frame to frame, most visible in skies, skin, and flat backgrounds.
- Aliasing: jagged edges on diagonal lines or text that a sharpening pass can introduce rather than fix.
- Codec and HDR mismatches: browser-based tools and some cloud services do not fully support 10-bit or HDR sources, which can flatten color on output.
- Color and skin-tone shifts: generative upscalers sometimes push warmth or saturation in ways that read as unnatural on faces.
Research into generative upscalers shows measurable progress on this exact trade-off. This work shows measurable progress addressing the trade-off between adding fine detail and reducing flicker often seen in generative methods. When a project involves faces, logos, or on-screen text, that is the moment to budget time for manual correction rather than trusting a fully automated pass.
Processing limits: real-time versus offline, and what hardware you need
Real-time video super-resolution, the kind used in live conferencing, runs under tighter constraints than offline restoration work. Microsoft’s own VSR documentation illustrates the split clearly: real-time scenarios are capped around 1440p output, while offline processing can reach full 4K because it is not racing a live video feed.
Typical constraints to plan around:
- Input and output resolution ceilings that vary by tool and by real-time versus offline mode
- Processing credits or concurrent job caps on cloud services
- File size limits that can force you to split longer event footage into segments
- Hardware acceleration availability, since some tools run faster on devices with a dedicated neural processing unit and fall back to CPU otherwise
Local GPU processing tends to make sense for frequent, large-volume work where cloud credits would add up fast. Cloud services fit occasional projects where buying hardware would not pay for itself.
How a production agency integrates AI upscaling into client work
AI upscaling never runs as a standalone fix. It sits inside a managed workflow where a producer reviews a test clip before committing to a full pass, checking faces, text, and motion the way the testing checklist above outlines. We lean on automated passes for straightforward archival footage and switch to keyframe-guided, manually supervised restoration when a project involves identity-sensitive content like executive interviews or branded on-screen graphics. If you are weighing whether your footage is a good candidate, we are glad to look at a sample and tell you honestly what to expect.
— Bernard Bonomo
Get an honest read on your footage before you commit to a full render
Through our Motionize AI video service, Bonomotion pairs AI-driven upscaling with a producer who actually watches the output before it reaches you, not just the hero frame. We run the same short-clip test and QC checks covered above on your own footage, whether it is a corporate video production project or event videography that needs a second life at higher resolution. If reviewing a representative clip before a full render sounds like the right call for your project, send us your footage for a project evaluation.
FAQ
What does AI video upscaling actually fix in old footage?
It restores perceived detail and reduces compression artifacts like blockiness and banding, rebuilding sharper edges than a simple resize can. It does not fix severe motion blur, poor focus, or footage shot in very low light, since the model can only work with detail that exists in some form in the source.
Is 4K always better than 1080p for upscaled video?
Not for every project. If your delivery platform compresses footage back down to 1080p anyway, upscaling to 4K mainly adds processing time and cost without a visible benefit, while wide static shots for real estate or yacht marketing often do show a real improvement at 4K.
Why does upscaled video sometimes flicker even when a single frame looks great?
Many upscaling models historically processed frames independently, which can cause brightness or detail to shift slightly from one frame to the next. Newer keyframe-anchored and multi-frame approaches, including methods described in SparkVSR research, reduce this by propagating a verified high-quality frame across the surrounding sequence instead of guessing frame by frame.
Can AI upscaling tools handle HDR or 10-bit footage?
Support varies widely, and many browser-based or lightweight cloud tools do not fully support HDR or 10-bit color, which can flatten or shift color on output. Transcoding a short test clip to an editable codec and checking color before a full render is the safest way to confirm compatibility.
How do I test an upscaling tool before running a full project through it?
Select a representative 15 to 30 second segment that includes faces, text, and motion, then run it through one to three preset options. Compare the results side by side at full resolution and watch multiple frame ranges, not just the opening seconds, since flicker and drift often surface mid-clip rather than at the start.